Update Enrollments (Start Dates, End Dates, and Status)
Target Audience: Buzz Administrators
Enrollments can be edited for individual students from the Users view, for all within a course from the Courses view, or via a batch upload if edits are associated with many users within the domain. Edits commonly made include the ability to change start and end dates, enrollment status, and a user’s role.
Individual and Course Enrollment Edits:
Video Short: Coming Soon
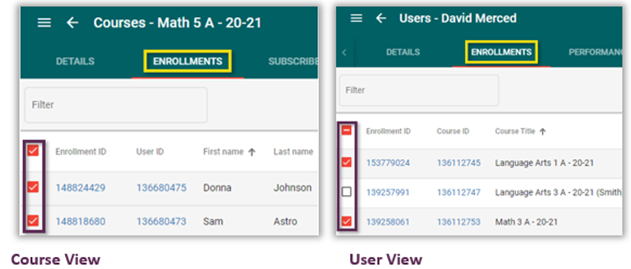
- Determine the most appropriate access point, as it is possible to make these edits from either the user view or course view.
- Access Users (via the hamburger menu) if editing multiple enrollments for a single user.
- Access Courses (via the hamburger menu) if editing multiple enrollments within a given course.
- Filter for either the user or course, depending upon the approach.
- Drill down on either the user or course ID.
- Select the Enrollments tab located on the navbar.
- Check the box of any enrollment(s) for which the same changes should occur.
- Select the ellipsis menu (3-dots) » Bulk update.
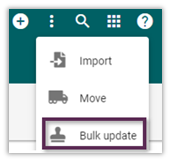
- Check the box of the enrollment changes desired:
- Status: The most used status changes are withdrawn, completed, or active.
- Role: Use to correct the user’s role from student to teacher or teacher to student.
- Start and End Dates: When withdrawing a student, remember to always change the end date to the date of withdrawal.
- Adjust the desired field(s) by using the dropdown menus or typing new dates.
- Check the box to verify.
- Select Update.
- Review to ensure the desired change(s) were made.
Bulk Enrollment Edits:
Video Short: Update Enrollments (Bulk)
- Select the hamburger menu » Accelerate Reports.
- Select the Enrollment Report.
- Choose filter options to narrow results to data needed » select the Update Data button.

- Select Click here below the report filters to download.
- Filter or sort the spreadsheet to display only the enrollments that need to be edited.
- Open a new blank spreadsheet.
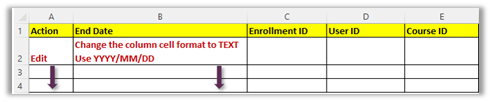
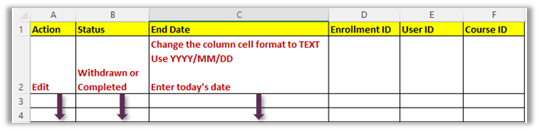
- Add the word Action in cell A1.
- Add the column heading in B1, C1… for enrollment characteristics that are being edited. ( e.g., Status, End Date, Role, etc…) Add as many column headings as needed.
- If the added column is a start or end date column » highlight the column and change the formatting to Text formatting. Do not leave as date or general formatting.
- Return to the downloaded and filtered enrollment spreadsheet and copy the Enrollment ID column » Paste the copied column data into the new spreadsheet into the next empty column.
- Return to the downloaded and filtered enrollment spreadsheet and copy the User ID column » Paste the copied column data into the new spreadsheet into the next empty column
- Return to the downloaded and filtered enrollment spreadsheet and copy the Course ID column » Paste the copied column data into the new spreadsheet into the next empty column.
- Type the word edit into cell A2.
- Type the associated enrollment corrections into columns B2, C2… (e.g., status, end date, role, etc…)
Sample spreadsheets for reference:
- Copy data in cells A2, B2,… down through all enrollments.
- Copy all data on the newly created spreadsheet including the column headers in row 1.
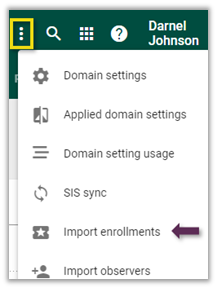
- Navigate to the domain homepage » Select the ellipsis menu.
- Select Import enrollments from the menu.
- Click into large white space on the import screen » paste copied spreadsheet data.
- Select 2 Validate data » check for errors in the lower-left corner before continuing. If errors appear correct the spreadsheet and recopy to repeat the import.
- Select 3 Import data » again check for errors before continuing.
- Select Done.